Skip to content

Have you been wondering when is golden hour? You’re not alone. We know that all it takes is a splash of beautiful light to bring out the magic in your shot and that’s why photographers love golden hour so much.
But capturing that perfect golden hue isn't always easy, especially if you’re still trying to figure out what is golden hour.
In this article, we'll break down everything you need to know about golden hour photography and how to make it work for you.
Let’s dive in!
Golden Hour Photography
- When is Golden Hour?
- Golden Hour Photography Preparation
- How to Shoot Golden Hour Photography
When is Golden Hour?
If you’re wondering when is golden hour, it encompasses roughly one hour after sunrise and one hour before sunset. During this time you can capture beautiful silhouettes, soft lighting, and amazing backlit shots.
Essentially, golden hour is the goldilocks time for outdoor lighting in photography.
If you're unsure of what time is golden hour in your location, try using some helpful apps. You can use a weather app to know when the sun will rise or set. Or, If you want a more exact time, try using a golden hour calculator app like The Photographer’s Ephemeris, or Helios Golden Hour (for iOS).
Once you're at a golden hour shoot, you'll notice the soft, warm, directional light. The lighting is like this because of the sun's lower position in the sky. This is what makes golden hour so special, as that lighting is much easier to shoot than the harsh light of a midday sun.
Here are some of the best aspects of golden hour in detail:
- It's Warm: when the sun is low in the sky, it creates a natural orange glow. Think of the warmth that radiates from a burning fireplace.
- It's Soft: Have you ever noticed that it takes a while to get dark after a sunset? When the sun goes down, the transition from light to dark is slow and gradual. This creates a soft light that's great for framing people in portraits.
- It's Directional: The position of the sun also allows you to get great side lit or backlit shots.
Knowing all that, it's easy to see why golden hour lighting can be so magical. All you have to do is plan ahead, and maybe increase the volume on your morning alarm clock.
Golden Hour Photography Photoshoot

You’ll only have a small window of time to shoot during golden hour, so make sure you're prepared. Getting the perfect golden hour shot requires a lot of repositioning too, so pack batteries, a portable charger, and extra memory cards.
Also, remember that you’re still shooting with the sun, and sunlight can be harsh on camera. To alleviate this, bring a reflector. You can even bring a gold shiny reflector to enhance golden hour’s natural hue.
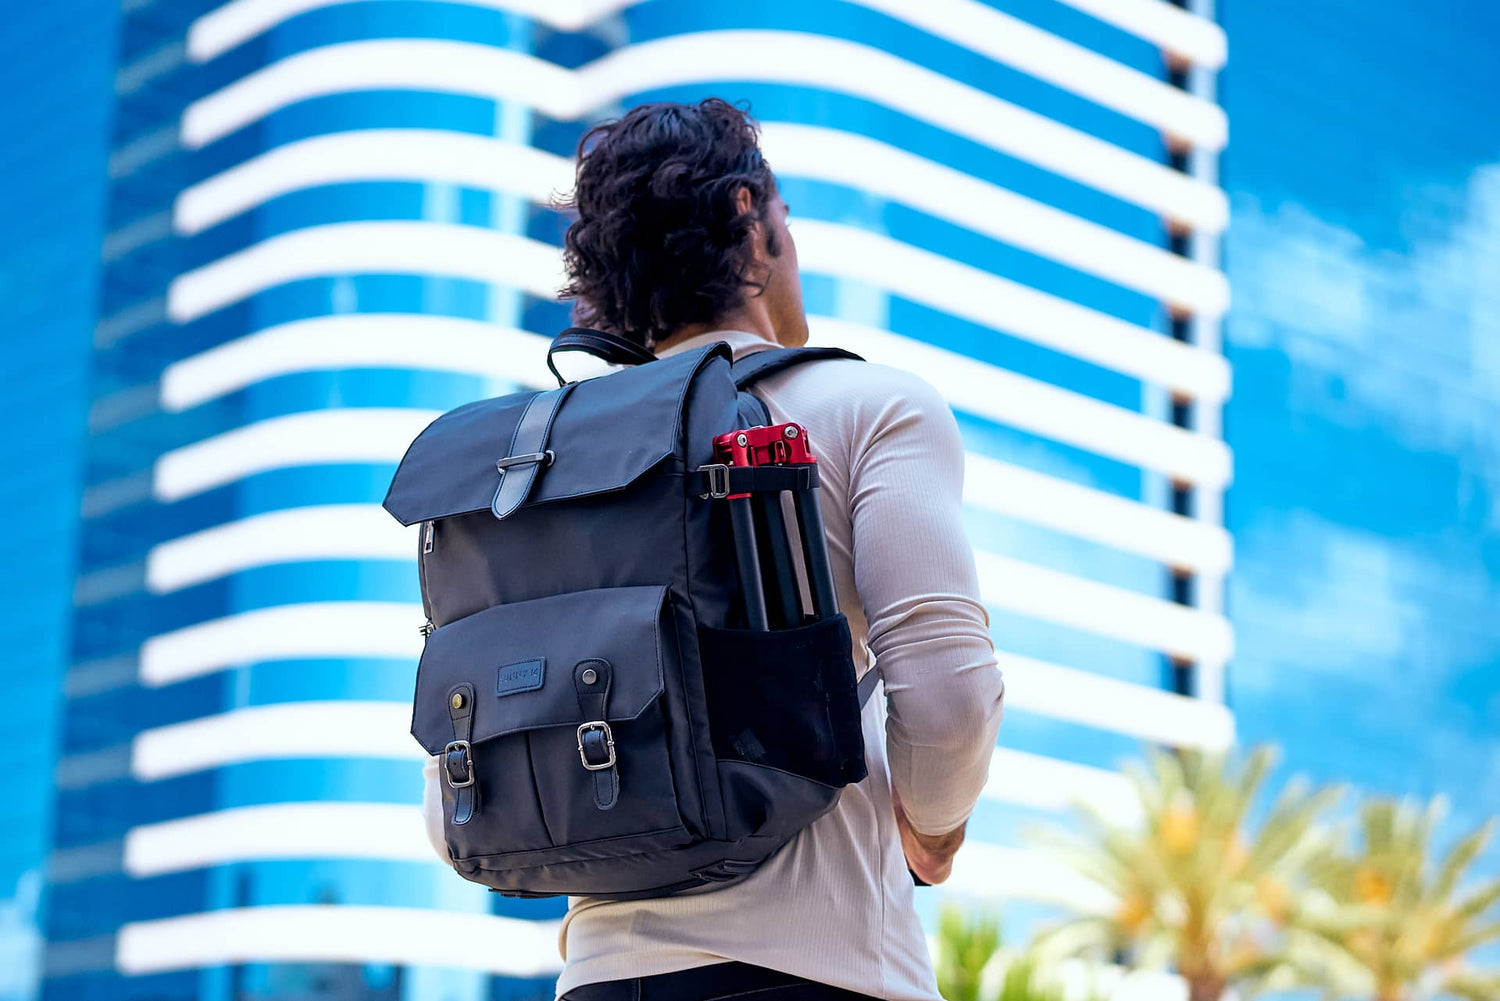
You'll be far more organized if you use a quality camera bag. Not only will your equipment stay safe, but you'll also have easy access to everything you need.
We suggest The Voyager camera bag. It's lightweight, spacious, and even weatherproof. You'll even have side access to a quick-draw side pocket if you find that perfect position and want to shoot as fast as possible. Most importantly, you'll arrive at your shooting location knowing your gear is safe and organized.
15 Best Golden Hour Photography Tips
After learning what is golden hour and what you’ll need for your golden hour photoshoot, we both know you don’t want to waste your small window of time. To help you achieve a stunning shot before time runs out, here are 15 of the best tips for shooting during golden hour.
1. Nail Your Timing

While golden hour lighting is an exceptionally easy time to shoot, that doesn't mean you shouldn't watch your timing. After all, you only have an hour or so, and you don't want to be rushing the whole time.
Instead, arrive at least an hour before sunset, and make sure you have all your equipment with you. set up your tripod and reflector before the opportune time. You can even walk around the area to see if you notice any prime angles or shooting spots.
When golden hour does arrive, don't beat around the bush. Having everything in place beforehand will give you that extra time you need to take several shots.
2. Get the Right Angle

Getting a great golden hour shot is all about angles and positioning. You have to factor in the position of the sun, and your own position as well.
Depending on your subject, you can move around and find an angle that works best for you. If you're trying to make a great portrait, have your light come in from the back or side of your model. Achieving just the right backlighting angle will give you that famous golden hour glow behind your subject.
3. Choose Your Camera Settings

Always shoot in manual mode when dealing with golden hour light. This will allow you to adjust your exposure, ISO or aperture when needed.
Consider using spot metering if your camera has it, as it will expose for your subject, instead of considering the entire scene. This can be a great option for portraits. On the other hand, without it you might find it easier to create a silhouette.
Overall, your golden hour photography settings will vary depending on the amount of light and your subject. Further reasoning as to why manual mode is so important!
Another important thing to keep in mind is the fact that your light will change drastically within a small period of time. Try using aperture priority mode and increase or decrease the ISO as the sun comes up or goes down. Also, continue to check your focus while you shoot to ensure that your scene remains sharp, despite lighting changes.
4. Pay Attention to Detail

Small details can make the difference between a good photo, and a great photo. When shooting during golden hour photography, watch out for small details that can really make your photography shine.
For example, if you were shooting a landscape, pay attention to the way light and shadows decorate the trees. Is there a specific way you can shoot that exaggerates the most striking aspects of your shot?
Especially if you're using the sun to create forced perspective photography, as in the image shown above, the details are important. Line up your shot and pay attention to how the light interacts with your subject. Take note of every detail.
5. Be Mindful of Shadows

Shadows can be a blessing or a curse during a golden hour photoshoot.
Of course, you should avoid light hitting your model from above when shooting portraits. This would create unpleasant shadows on the model's face.
Typically though, this isn't a common problem during golden hour photography, as the light is highly directional.
In fact, shadows can actually be used to create stunning golden hour photographs. They add texture and detail to an image, and give a sense of depth. Golden hour accentuates these characteristics, as the position of the sun will give you long shadows.
When used properly, long shadows can enhance the drama and color of your shot. Shadows also create great contrast, balancing the warm reds and yellows of golden hour lighting with darker colors.
Finally, it's important not to forget your own shadow! When taking photos where the sun is behind you, make sure that your own long shadow doesn't show up in the shot. If you spot yourself, be sure to find a more ideal position.
6. Use Warm Colors

Colors are a great way to evoke an emotional response from your viewer. No doubt, golden hour lighting is one of the best times to use warm colors to your advantage.
Warm colors like oranges, yellows and reds can be a great way to make your photo feel happy, excited or optimistic. These feelings are part of the reason why golden hour is nicknamed "magic hour".
Portraits also benefit from warm colors, as the light enhances your subject's skin tone. Instead of making your subject look like a pale ghost, you can give them a warm tone.
7. Make Your Shot Directional

Golden hour photography is known for its directional light, so make sure your shot captures a sense of direction too!
For example, you could have your model pose at a sideways angle while being hit by side lighting. This creates motion and direction in your photography without you even having to take an action shot.
Again, play around with angles and find the perfect way to capture those directional shadows and lighting.
8. Use Backlighting

Backlighting occurs when your main light source is behind your subject. This is one of the most popular and prominent aspects of golden hour photography. It's great for portraits, landscapes, and creating silhouettes.
You can also achieve a dramatic and gorgeous glow when your subject has some degree of translucence. This is because the translucent part of the subject will be strongly lit, while the opaque part will be darker.
Think of hair, feathers, leaves, and flowers. All of these things have translucent characteristics, and can easily be made to "glow" in front of golden hour light.
9. Create Silhouettes

If you want to take backlighting to an interesting extreme, try your hand at making golden hour silhouettes. When you create a silhouette, your subject is "blacked out" and the background is well exposed. Typically, the goal of a silhouette is to create an interesting and recognizable shape.
The high contrast between your golden hour lighting source and your subject can create amazing silhouettes. Position your subject in front of the light source and be prepared to adjust your camera settings.
Keep an eye on your exposure. You'll need to set your exposure so you can capture the sky with all its colors and details. The goal of which being to underexpose your subject. Focus on the background until your subject is completely dark.
10. Create Starbursts

Golden hour photography is a great time to produce some amazing starburst effects. This is when the light from the sun pierces out from its origin point.
To create one, narrow your aperture (try between f/16 or f/22). After that, use your shutter speed and ISO to underexpose the image while the sun is in frame.
This effect is also easier to pull off when the sun is as small as possible. You can achieve this rather easily by finding an object or subject to hide the sun behind. You could use your model, or a tree.
11. Play with Lens Flare

While lens flare is often considered a negative, there are many instances when it can actually enhance your golden hour photos.
Learn to manipulate light bursts by shooting towards the sun from different angles. Take several shots around your subject and see which angles add an interesting lens flare.
Remember, subtlety is key. A good lens flare shot knows how to balance the interesting camera effects, without letting them overshadow the rest of the image.
12. Use a Tripod

Tripods can be absolutely essential for working with golden hour light. They provide crucial stability when you need it most.
After all, to close the aperture of your shot or reduce your ISO to the highest quality setting, you'll need a tripod to maintain balance. This can be especially useful for capturing a complicated silhouette, or getting a well lit action shot.
13. Avoid Crowds

If you're taking a photo in a city or of a landscape, think about getting up early instead of risking late-day crowds. During early hours, you can enjoy golden hour photography with privacy. You just have to be okay with waking up at 4 or 5 in the morning!
14. Make the Mundane Magical

We've all seen our fair share of trees, pathways and old fences. Normally, they can be pretty mundane. However, golden hour photography can make everyday objects like these appear dream-like.
Overall, golden hour light is a great way to make any subject look magical. You can give your subject a sense of nostalgia and warmth that they wouldn't otherwise have.
15. Capture Sunsets and Sunrises

Who doesn't love a beautiful sunrise or sunset? Really, that's what golden hour is all about.
During golden hour photography, you can enjoy and capture the true beauty of these moments. You will see amazing scenes wherever you are, and have memories of them on your camera.
You might even want to consider bringing friends, family or other company to enjoy the moment with you. There's a reason why golden hour is used in so many family and romance photoshoots!
Up Next: What is Ambient Light?
Now that you know all about golden hour time, how to capture its lighting, you're ready to get out there and start shooting! Let us know in the comments what subjects you think would shine in a golden hour shoot.
And, if you want to learn more about other forms of ambient light, check out our article on the different types of ambient light!